Underwater Photography Tips: Camera Settings That Actually Work
I bought a camera, a housing, and two strobes. I took them on a liveaboard trip. I shot 1,400 photos in a week. When I got home and loaded the card, roughly 1,300 of them were blue, blurry, or both.
That was expensive. Not the gear — the realization that gear doesn't fix ignorance. I spent the next six months learning settings by trial and error, dive after dive, shot after shot. Here's what I actually use now.
No "experiment and find your style" advice. Specific numbers you can dial in before your next dive.
Why Auto Mode Fails Underwater
Your camera's auto mode is calibrated for air. It assumes:
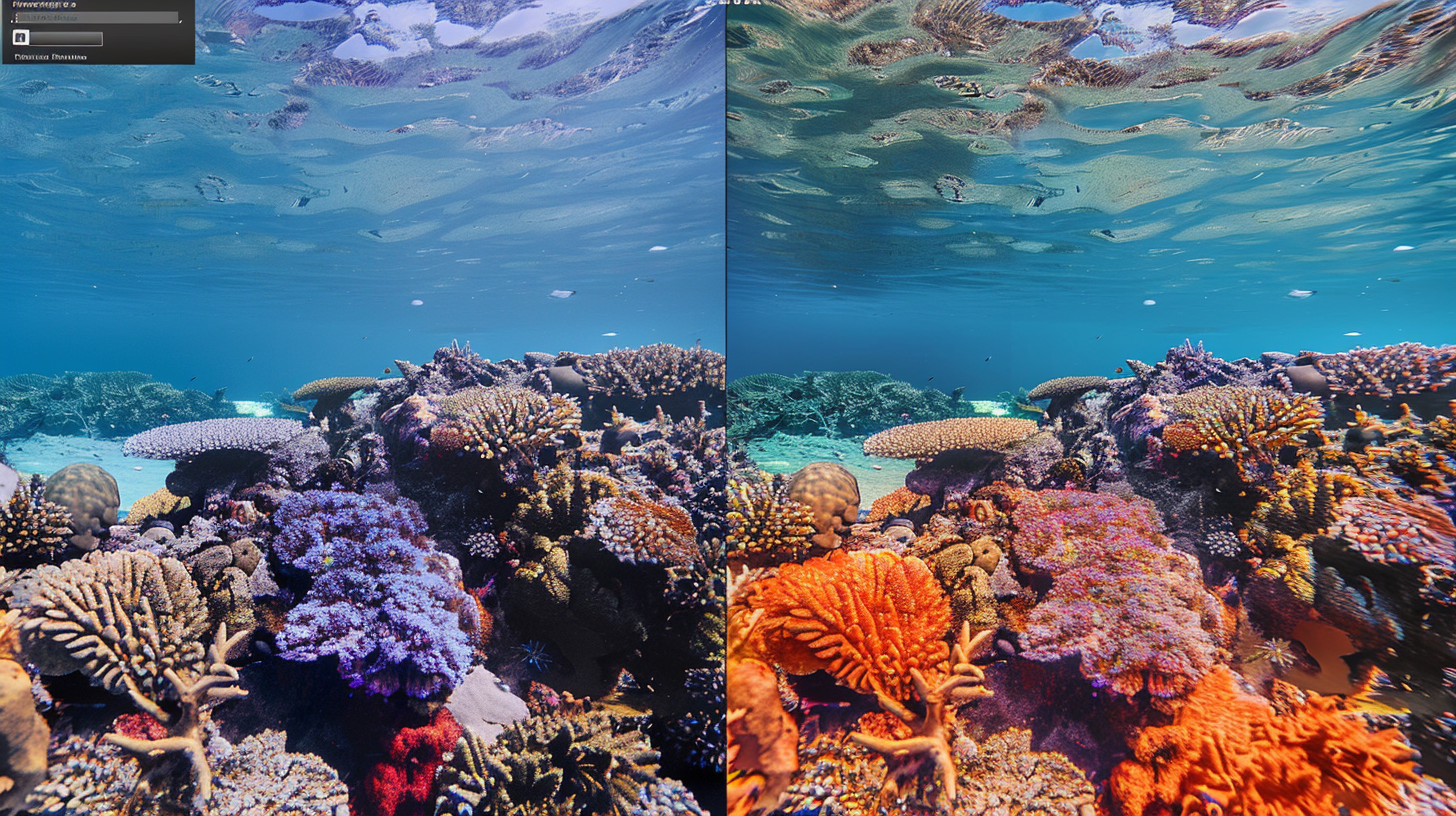
- White light is available. Underwater, warm colors are progressively stripped as you descend. By 10 meters, red light is essentially gone. Auto white balance can't fully compensate because the data isn't there — Beer-Lambert Law is merciless.
- Subjects are at normal distances. Underwater, you need to be within 1-2 meters because water kills contrast and sharpness over distance. Particles in the water column scatter light. Every meter of water is like shooting through a fog filter.
- Exposure metering reflects the scene. The dominant blue water background tricks your meter into underexposing the subject.
- Autofocus can find contrast edges. In low-contrast underwater scenes, AF hunts endlessly, missing the shot.
My Universal Starting Settings
Before the specific scenarios, here's my baseline for almost any underwater photo:
- Shoot RAW. Always. RAW files give you latitude for color correction in post. JPEG throws away data you'll desperately want back when recovering reds and oranges.
- ISO 200-400. Low ISO keeps noise down. Noise is your enemy underwater because color correction amplifies it.
- Aperture: f/8. Sharp across the frame with good depth of field. My go-to starting point.
- Shutter speed: 1/125s minimum. Surge, current, and swimming creatures mean everything is moving. 1/125s freezes gentle motion. Fast fish? 1/250s or higher.
- White balance: Manual or RAW. Set for your depth, or shoot RAW and correct later. I recommend RAW.
Scenario 1: Wide-Angle Reef Scenes with Strobes
I'm on a coral reef at 10-20 meters. Wide-angle lens. Dual strobes.
My settings:
- Mode: Manual
- ISO: 200
- Aperture: f/8 to f/11
- Shutter speed: 1/125s to 1/160s
- Strobes: Half power, angled outward at 45 degrees from the lens axis
- White balance: 5500K (daylight) — my strobes provide white light, so daylight WB is correct for the strobe-lit foreground
- Background too dark? Slow the shutter to 1/60s. More ambient light.
- Background too bright? Speed up to 1/200s. Watch your flash sync speed.
- Foreground too bright? Reduce strobe power or close to f/11.
- Foreground too dark? Increase strobe power or open to f/5.6.
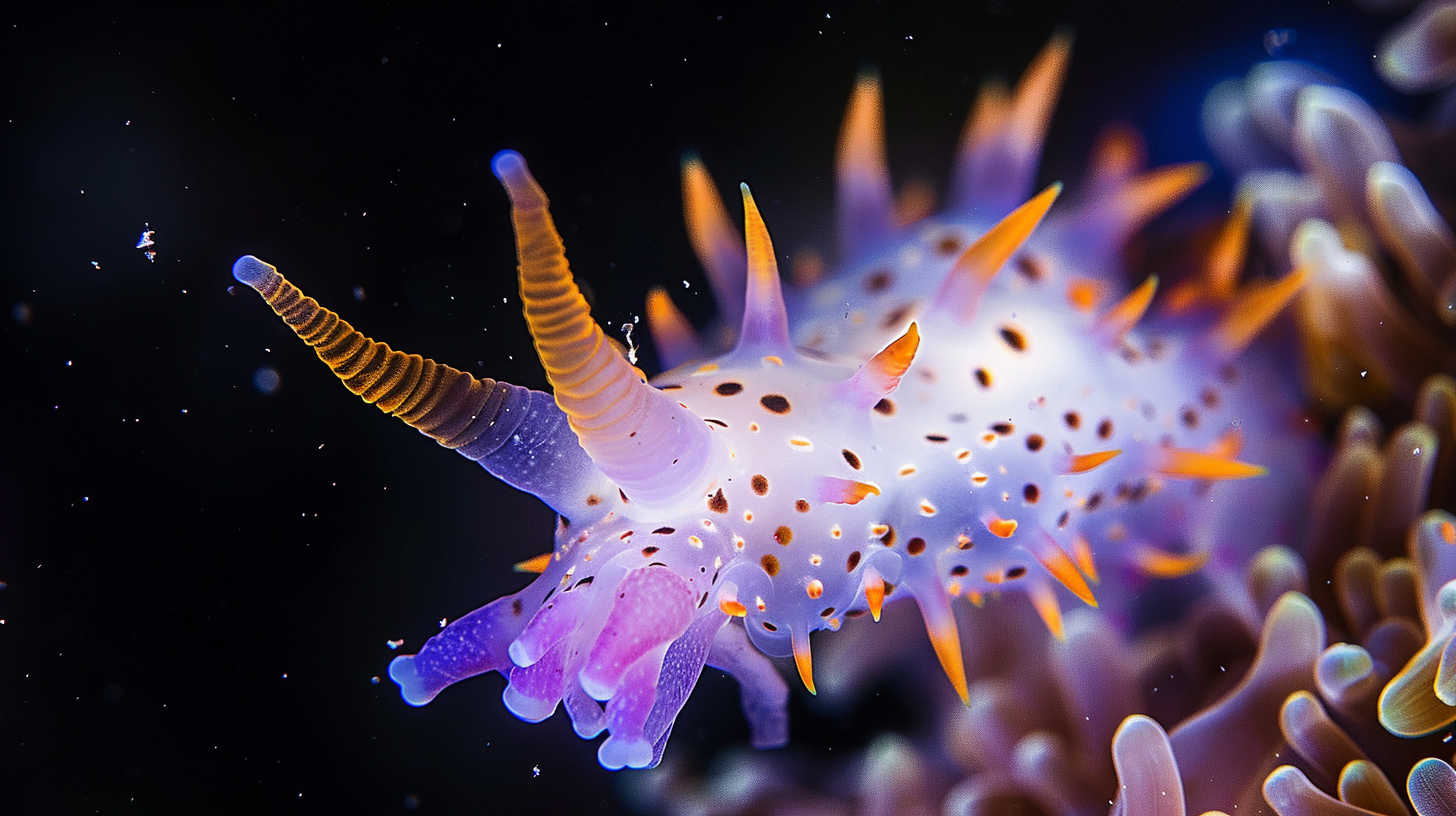
Scenario 2: Macro
I've found a nudibranch. I want every rhinophore in focus.
My settings:
- Mode: Manual
- ISO: 200
- Aperture: f/16 to f/22
- Shutter speed: 1/200s to 1/250s
- Strobe: Single or dual at quarter power, positioned close to the subject
- Focus: Single-point AF, aimed at the eye (or most detailed part)
The actual exposure duration is determined by the strobe flash (1/1000s to 1/10000s), not the shutter speed. The shutter just needs to be at or below flash sync speed.
Mistakes I've made so you don't have to:
- Aperture too wide. At f/5.6, only the rhinophores are in focus. The body is a smear.
- Not enough light. Small apertures need more light. Position strobes close — 15-30cm from the subject.
- Wrong focus point. If it has eyes, focus on the nearest eye. Sharp eyes make any photo look right, even if other parts are slightly soft.
Scenario 3: Available Light (No Strobes)
Just my camera. Natural light only.
My settings:
- Mode: Aperture Priority or Manual
- ISO: 400-800
- Aperture: f/4 to f/5.6
- Shutter speed: 1/60s to 1/125s
- White balance: Manual for depth, or RAW
What I do without strobes:
- Shoot upward. The surface and sun add drama and provide natural light.
- Get within 1 meter. Every meter of water between you and the subject degrades everything.
- Use Snell's window. That circular window of light above you — caused by total internal reflection at the critical angle of 48.6° — creates a natural frame. It's physics being artistic.
- Embrace the blue. Silhouettes of divers, turtles, or mantas against bright blue water can be stunning without any color correction.
Scenario 4: Night Diving / Black Water
The most rewarding photography I've done. Also the most technically demanding.
My settings:
- Mode: Manual
- ISO: 200-320
- Aperture: f/11 to f/16
- Shutter speed: 1/160s to 1/250s
- Strobes: Full power — they're your only light source
- Focus: Continuous AF with focus light, or manual focus
Position strobes to light the subject but not the particles between you and the subject. Angle strobes outward and slightly behind the lens plane so backscatter particles aren't illuminated. This is the single biggest technical skill in night diving photography.
Post-Processing: The Minimum Workflow
Every underwater photo benefits from post-processing. Here's my Lightroom routine:
1. White balance correction. Eyedropper on something neutral — sandy bottom, white coral. This single adjustment often transforms a blue image into a properly colored photo. 2. Increase contrast. +15 to +25. Water kills contrast. Add it back. 3. Clarity/Texture. +15 to +30 on clarity. Mid-tone contrast makes reef textures pop. 4. Dehaze. +10 to +25. Remarkably effective on underwater photos. 5. Red channel boost. If colors still skew blue, increase red in HSL or curves.
The Most Important Setting
The single most impactful thing you can do for underwater photography isn't a camera setting. It's getting closer.
David Doubilet said it: "Get close, then get closer." Every centimeter of water between your lens and your subject reduces sharpness, contrast, and color. Shoot within arm's reach whenever safely possible.
I ruined 1,300 photos learning this. Now I'm telling you for free.
More Gear Reviews
Browse all gear reviews on the [OkToDive blog](/blog). Every review is written by a chemist who tests gear, not a marketer who photographs it.
→ [Trip Planner](/trip-planner) — match your gear to the right destination | [Best places to dive](/blog/best-places-to-scuba-dive)
→ [Subscribe to The Depth Report](/#newsletter) — monthly gear reviews, dive site scores, no hype.
I'm Chad. Your chemist who finally learned to stop shooting from three meters away.